Cancer is a life changing experience. Suddenly your priorities, your commitments change, the way you look at the world, yourself and your relationships change. This has been the case with me also. One good thing that cancer has brought into my life is the practice of Yoga. In this article we discuss a few asanas that can prove helpful for a cancer survivor.
Though I learnt the asanas during my teens but the way I have approached them after cancer is with a totally different perspective. I write about this more from my experience rather than theoretical reading. It has been about eight months that I have been practicing yoga now. I put myself on it nearly after 1 year and 3 months of my treatment coming to an end. I write this article because today it has been nearly ten days that I had a full session. My mind and my body are missing all the stretches and deep breathing. We have already discussed the benefits of yoga for cancer patients and survivors broadly and also discussed deep breathing as a practice for relaxation and reducing stress.
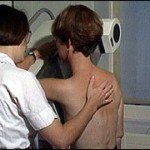
A person operated for breast cancer followed by a range of treatments may experience all or some of these symptoms – swelling in the arm, a feeling of heaviness, tightness in the arms and/or the chest area. Let us look at a small exercise routine for the shoulders and upper body that can help deal with all these symptoms and after effects and facilitate return to normal life.
Tip: Always start with neck movements and follow by shoulder circles.
Shoulder Stretches
There are many shoulder stretches in yoga and other forms of exercise. The idea to open the shoulders is to help one open the chest and stretch it in order to facilitate a full breath – an elixir of life. Some of the stretches that can be practiced are:
1. Reaching the Arms Up and High

A very easy stretch, it works excellently for the shoulders. Sit on the edge of your chair or on the floor. Make sure your weight is equally distributed on both the sitting bones. Keeping your body straight, hands on your sides, allow your shoulders to drop as far from your ears as possible. Take a deep breath and stretch your arms overhead. Interlock the fingers and turn your palms upwards. Once again try to drop them far from your ears. Hold the pose for 5 breaths. With an exhalation brings your arms down in a graceful motion. Repeat the stretch five times. I find this pose to be a very happy pose, it seems to remind of laughing Buddha. You can repeat the stretch by stretching your arms backwards also.
2. Locked elbows shoulder stretch

The next stretch that you can perform for opening your shoulders is the locked elbows stretch. Outstretch your left arm in front of you at shoulder height. Your arm should be parallel to the floor. Bring your right elbow directly below the left elbow. Start to press your left arm in this lock. Move your torso and the left arm towards the right. Make sure to remain seated firmly on both your sitting bones. Repeat the stretch with your right arm outstretched. Repeat the stretch 5 times on each side.
3. Reverse Prayer

Another pose that may look complicated but is easy to perform is the reverse prayer pose. Remain seated on the floor or the chair. Spread your arms on to your sides. Fold them at the elbows and take them on your back. Press the palms close as in the namaskar or prayer position. Press your little finger against your spine. Avoid the temptation to bend it forward and straighten your neck. Hold the pose for 5 breaths.
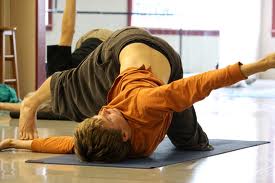
4. Thread the Needle Pose
This is one of my favorite poses. The immediate results that I feel after doing this pose is increase in the range of arms, opening of the chest and flexibility in the upper torso.
A seemingly complicated pose it is easy to perform. Doing it in the class will make you feel and look like a connoisseur. Come on your all fours. Slide your right arm underneath your body till your right shoulder and temple rests on the ground. Raise your left arm straight. Start by keeping it perpendicular to the floor but slightly aim towards moving it backwards. As your flexibility and the range of your arm will increase you will be able to touch the back of your left hand on the floor. Hold the pose for 5 breaths and repeat with the left arm under your body.
We have tried to move from easy to difficult poses. In the next article we take three more asanas that can prove helpful.